I signed up for Stitched In Color's Curves Class this month, and last week we covered improv curves. Actually, I've done some improv curves before, so for my practice this week, I worked on an improv curves WIP... the quilt that I started at Sherri Lynn Woods' Get Your Curve On Workshop.
To be honest, this poor fellow never got a lot of love from me. We had the option in the class to make "c" shapes or "s" shapes, and I thought "oh s's are pretty..." so I made those. Then I laid them out and was reminded of worms. Then I sewed them together and was reminded of brains. Then I made more, sewed them on, and was reminded of intestines. Aside from the slimy disgustingness of the squiggle shape, I really did not like how I distributed color in the piece. There were smaller moments in the quilt that I really loved, but they disappeared in the overall top.
I read in Rachel's class intro that she had been inspired by Sherri Lynn Woods' work, but when she really thought about it, she didn't want to do quite the same thing. When I brought this top out of hiding this week, I looked at it and decided that I felt the same way. So I chopped it to pieces! Don't worry... I sewed it back together after.
Cutting the piece into blocks allowed me to re-distribute color and get rid of the wormy-ness of the original work. I got my curves practice in for the week by piecing some new improv curves to get enough blocks for a 40" square top. Having finished this - now I really want to make a wonky rail fence quilt. Wouldn't that be so pretty?
I straight-line quilted an echoed X and backed it with a piece of fabric that I hand dyed using the shibori technique. I used a medium grey Kona for the binding to keep things calm and let the top be the star. I did put in a little stripe of dark plum anywhere that I joined strips, just for a bit of interest that's not too in-your-face.
I hadn't planned to finish any UFOs this month because I have a lot on my plate at the moment. I surprised myself and did one almost by accident. Maybe this is getting to be a habit?? That would be awesome if it were true. Who else has been hittin' the UFOs this year?
Monday, January 28, 2013
Thursday, January 3, 2013
New year, new project
It's resolution time again...
Last year, I made resolutions to take my machine for service, finish UFOs, limit my fabric purchases, and make clothing. In the end I rocked the first two, bombed the third one (fabric collection still growing by leaps and bounds) and almost completed the last one (I sewed 5.5 garments and my goal was 6). Thanks to my UFO-busting goal, I also finished 9 quilts in 2012, which is awesome compared with my previous average of two quilts per year.
My goal for this year is to get down to just 1 quilt-in-progress. It's gonna be a rough road, since thanks to a few new starts toward the end of the year, I currently have 9 quilts going. Yeep! To help me out with this goal, I've joined my friend Melissa's awesome group, A Lovely Year of Finishes. The plan is to finish one project, big or small, every month.
I'm excited! For the first month, I am actually taking a break from quilting for what should hopefully be a quick & fun project:
Yes, I am finally making a Renfrew! I have been eyeing this pattern almost since it came out, and I snatched it up a few months ago when it was on sale over at A Fashionable Stitch. This is going to be a bit of a practice go using some green stretch vellure (yum haha). But I do need a few warm & comfy shirts for slumming around the house this winter, and I think this guy will fit the bill.
What's your first project for the new year?
Last year, I made resolutions to take my machine for service, finish UFOs, limit my fabric purchases, and make clothing. In the end I rocked the first two, bombed the third one (fabric collection still growing by leaps and bounds) and almost completed the last one (I sewed 5.5 garments and my goal was 6). Thanks to my UFO-busting goal, I also finished 9 quilts in 2012, which is awesome compared with my previous average of two quilts per year.
My goal for this year is to get down to just 1 quilt-in-progress. It's gonna be a rough road, since thanks to a few new starts toward the end of the year, I currently have 9 quilts going. Yeep! To help me out with this goal, I've joined my friend Melissa's awesome group, A Lovely Year of Finishes. The plan is to finish one project, big or small, every month.
I'm excited! For the first month, I am actually taking a break from quilting for what should hopefully be a quick & fun project:
Yes, I am finally making a Renfrew! I have been eyeing this pattern almost since it came out, and I snatched it up a few months ago when it was on sale over at A Fashionable Stitch. This is going to be a bit of a practice go using some green stretch vellure (yum haha). But I do need a few warm & comfy shirts for slumming around the house this winter, and I think this guy will fit the bill.
What's your first project for the new year?
Saturday, December 15, 2012
Stripping for charity
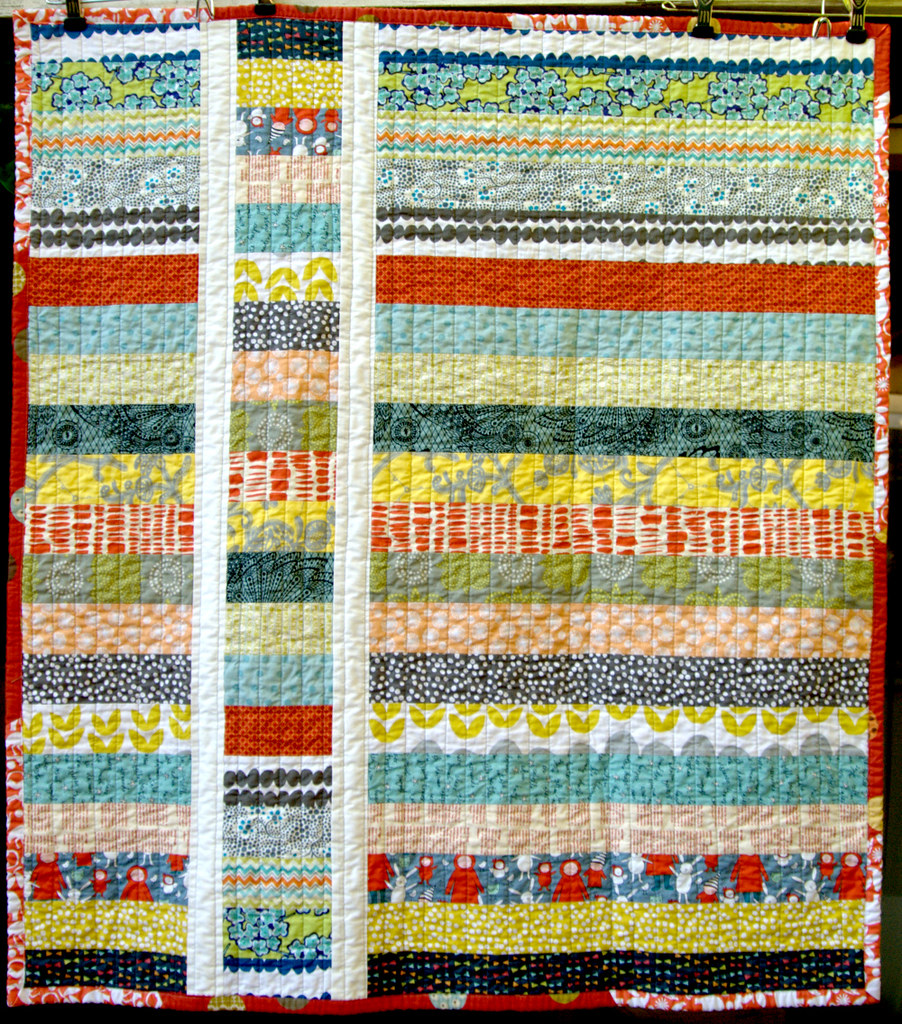
I have a new quilt to share today, this one I made at the guild charity sew day. We all whipped up quilts using Cluck Cluck Sew's free Strip & Flip pattern/tutorial. This entire quilt (including binding) took 8 hours to sew... I know because I did it all at the event.
I believe that nearly all of the fabric for this quilt was donated to Bay Area Modern by Julie of the Intrepid Thread. Thank you, Julie! I opted for a hopefully boy-friendly selection of colors and fabrics and was definitely working outside of my comfort zone there, but I love the combination.
My takeaway from making this quilt is that the pattern shows best if you arrange your strips in a gradient of some sort. With a random placement, it's not immediately obvious that the center strip is intentionally flipped and some of the pattern's magic is lost.
I had a leftover stack of strips that made it onto the back of the quilt, and finished it all with evenly spaced vertical quilting and a pieced binding:
This quilt joined the guild charity pile for Project Night-Night. We had a goal for 2012 of (I believe) making 40 charity quilts, and we donated one hundred and one quilts this month. Whoa guys! That is crazy awesome and I hope that we can keep it up next year.
I believe that nearly all of the fabric for this quilt was donated to Bay Area Modern by Julie of the Intrepid Thread. Thank you, Julie! I opted for a hopefully boy-friendly selection of colors and fabrics and was definitely working outside of my comfort zone there, but I love the combination.
My takeaway from making this quilt is that the pattern shows best if you arrange your strips in a gradient of some sort. With a random placement, it's not immediately obvious that the center strip is intentionally flipped and some of the pattern's magic is lost.
I had a leftover stack of strips that made it onto the back of the quilt, and finished it all with evenly spaced vertical quilting and a pieced binding:
This quilt joined the guild charity pile for Project Night-Night. We had a goal for 2012 of (I believe) making 40 charity quilts, and we donated one hundred and one quilts this month. Whoa guys! That is crazy awesome and I hope that we can keep it up next year.
Monday, December 3, 2012
Pillow Talk
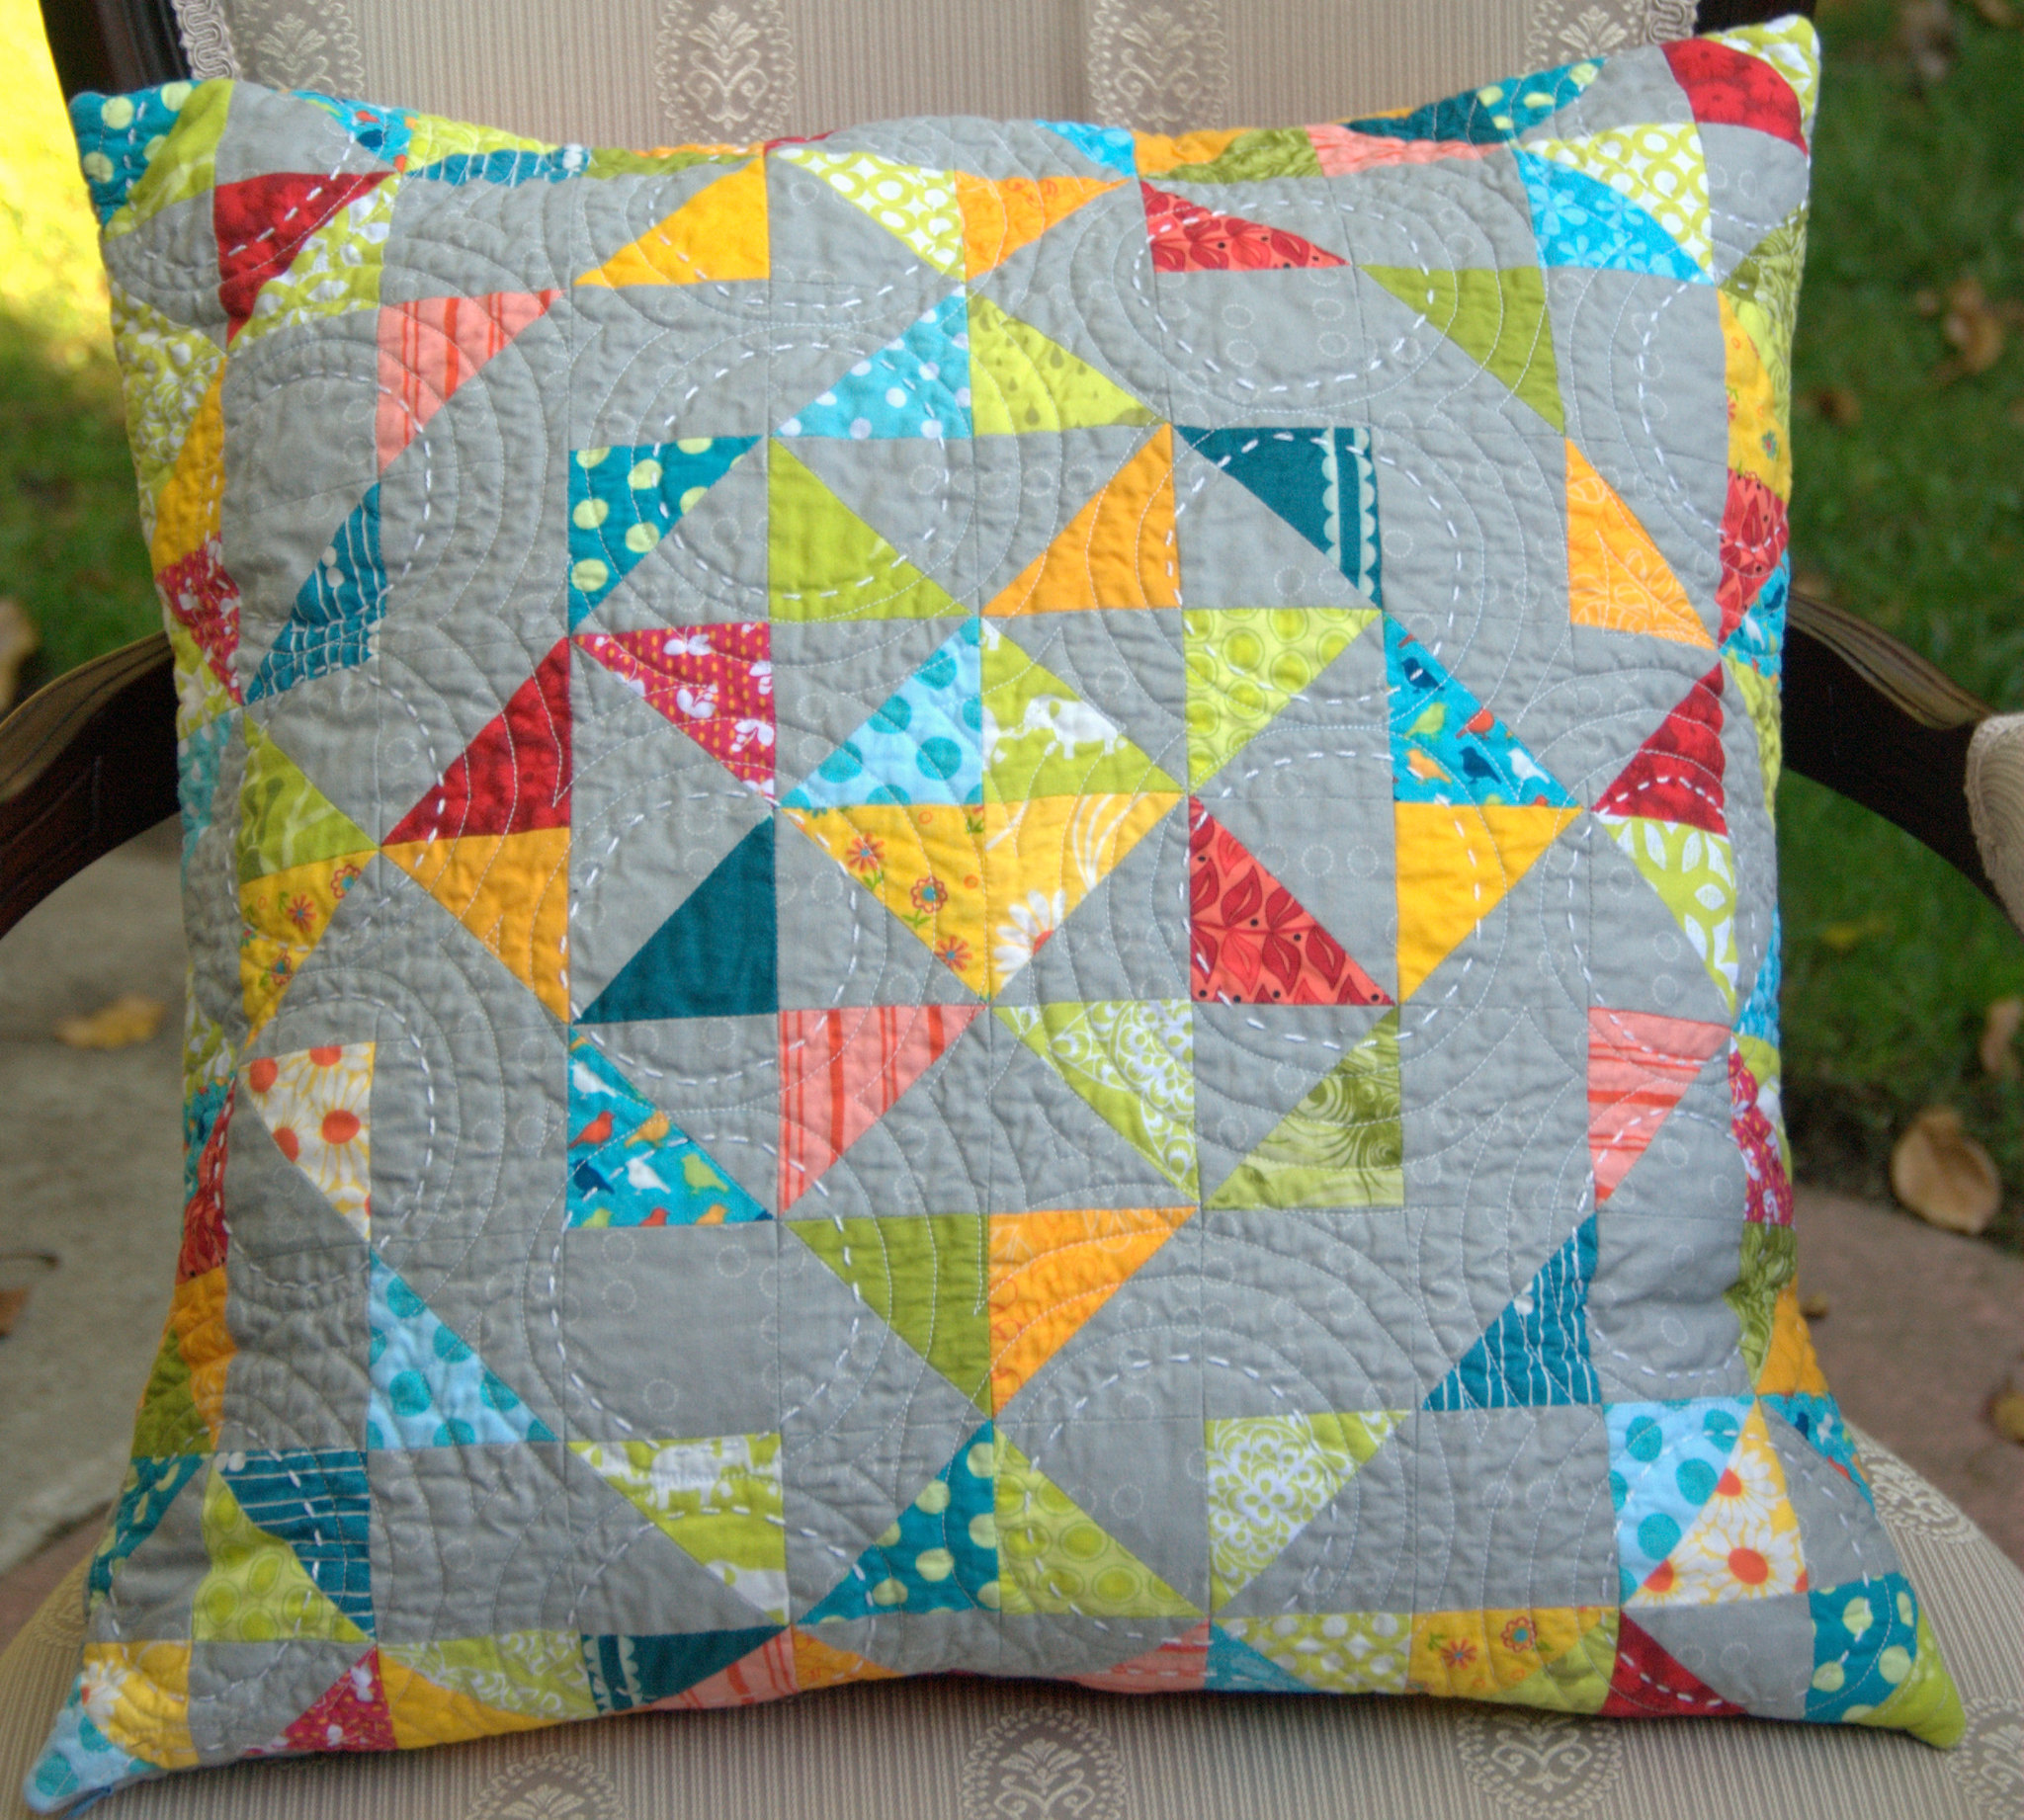
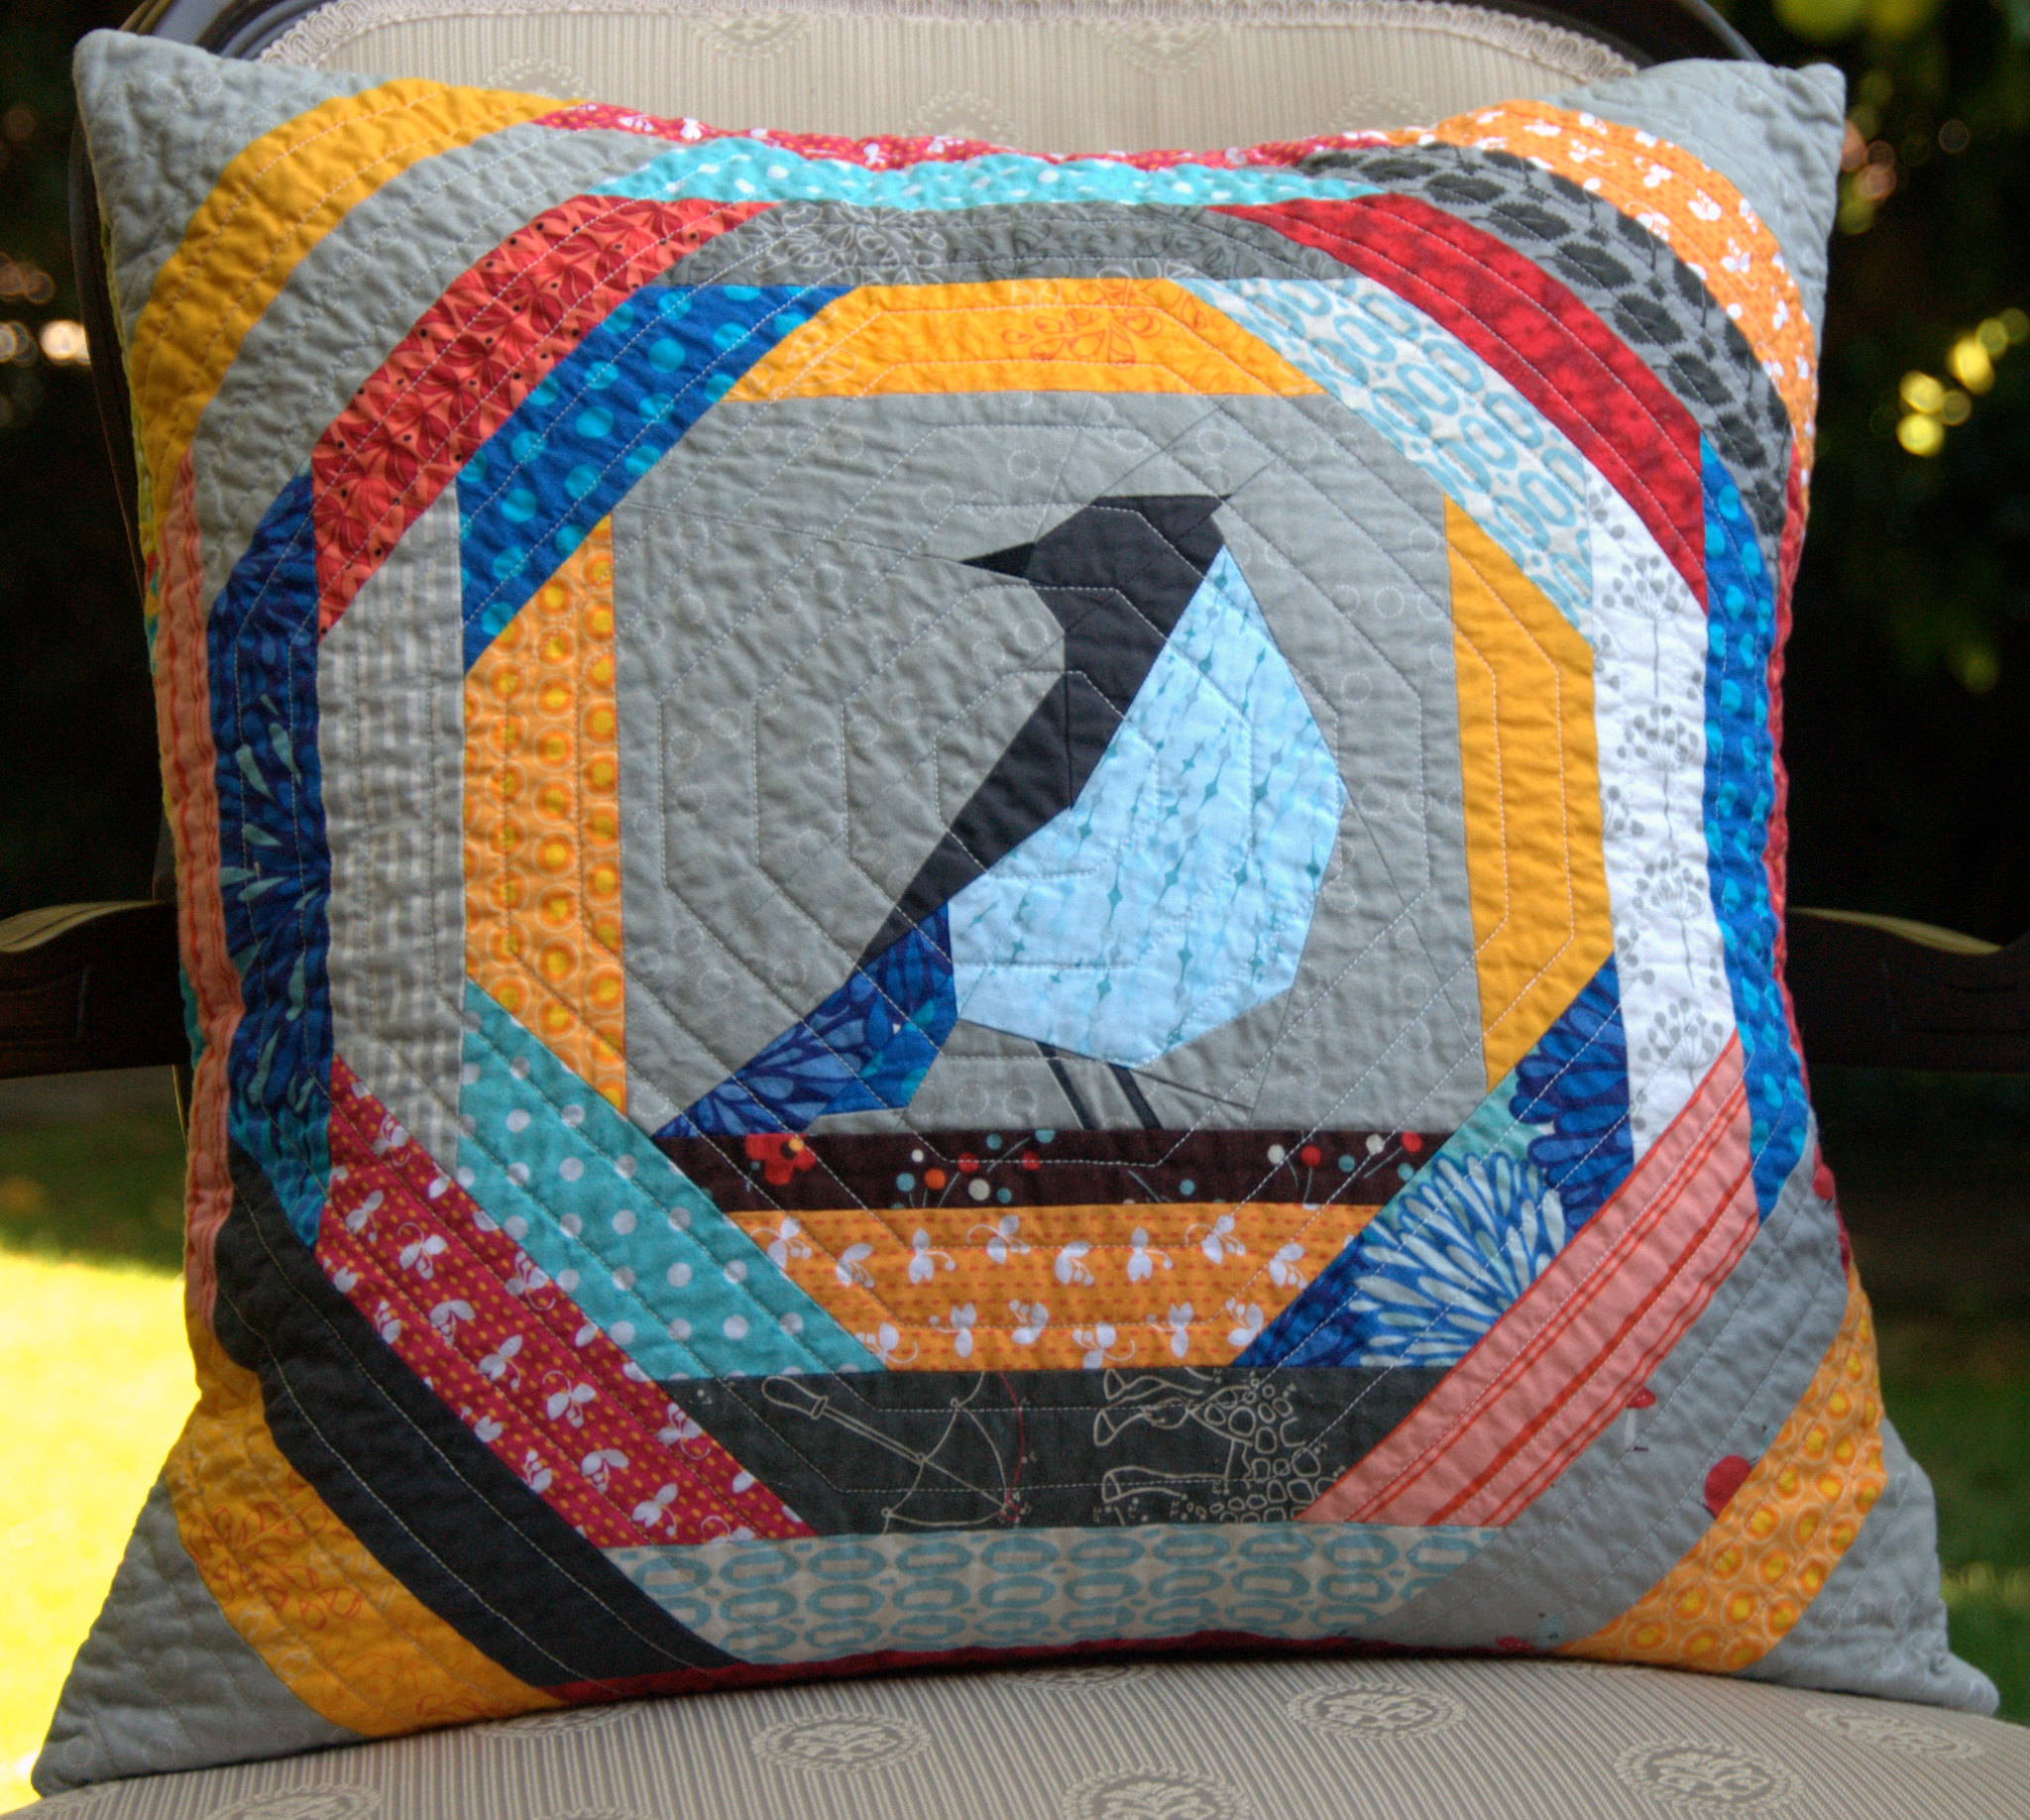
The ninth round of Pillow Talk Swap is currently wrapping up, with packages still winging back and forth internationally. Luckily for me, both my send and receive packages have already arrived This round I made for Nannette, who likes birds, bright colors, and fabulous quilting. An awesome match for me, since I like... birds, bright colors, and fabulous quilting! Way to go, swap mamas - picking what to make for her was easy-peasy.
I made half-square triangles for one side and arranged them into a fancy star pattern that I drafted:
But a few bird fabrics isn't quite enough, so I drafted a paper pieced bird for the other side and framed it out into a pineapple block:
If anyone is interested, I can post the "pattern" for this bird, but let me warn you that it's not very professionally drafted! People who sell paper piecing patterns design carefully and smartly so that their block is easy to assemble. Mine has to be put together in several pieces and also requires that some areas be pre-sewn before adding them to the paper pattern.
And for me? I received a gorgeous pillow (on the right) from Lori H. Designs, which beautifully matches the pillow that I got from Julie a few months back (on the left) and is so exactly what I wanted. She even used a geometry print that I recently fell in love with for the background. Basically, it's perfect! Thank you so much, Lori.
So many pillows were lovely this round, so check out the Flickr group if you need some awesome pillowy inspiration.
I made half-square triangles for one side and arranged them into a fancy star pattern that I drafted:
But a few bird fabrics isn't quite enough, so I drafted a paper pieced bird for the other side and framed it out into a pineapple block:
If anyone is interested, I can post the "pattern" for this bird, but let me warn you that it's not very professionally drafted! People who sell paper piecing patterns design carefully and smartly so that their block is easy to assemble. Mine has to be put together in several pieces and also requires that some areas be pre-sewn before adding them to the paper pattern.
And for me? I received a gorgeous pillow (on the right) from Lori H. Designs, which beautifully matches the pillow that I got from Julie a few months back (on the left) and is so exactly what I wanted. She even used a geometry print that I recently fell in love with for the background. Basically, it's perfect! Thank you so much, Lori.
So many pillows were lovely this round, so check out the Flickr group if you need some awesome pillowy inspiration.
Friday, October 19, 2012
R-burst Quiltalong - Embroidery
This post is a part of the R-Burst Quiltalong.
Ok, it's been a while, but I'm back with a quiltalong update. Today we'll be covering the optional embroidery squares for the R-burst block. For my quilt, I am making little 2" embroideries on solid fabric and mixed them in with my print squares, like this:
![]() |
| As you can see, I'm chunking away! I haven't finished any complete blocks yet, eek! |
I'm using 3 embroideries per block, so I picked out a total of 36 patterns (info on where I found them is at the bottom of the post). My theme is various animals, and I definitely went for cuteness! For these blocks, the finished squares are only 2", so most likely you will have to re-size and trace any design that you buy (since most are bigger than that). That means that it is just as easy to use trace a picture or a line drawing, or even use a part of a coloring book page as it is to use an actual embroidery pattern.
For example, some of the embroideries that I did are based on cute art by Celesse. I just dropped her a quick note and got her permission to use them for embroidery and post the results on my blog. I also used drawings from this Japanese stamp making booklet that I learned about via Flickr.
![]() |
| Finished bunny embroidery, based on Li'l Pun'kin art by Celesse Backstitch and little filler stitches as grass |
As far as transferring embroideries, to start with I mark off my fabric in 2" squares, with half inch gaps between them for the seam allowance. I like to leave a full inch at the edges so that there is room for my embroidery hoop. The boxes help center the designs to that they aren't too close together and so that if I make any on the fly changes, I know where they will end up compared to the final quilt square.
I prepare the images by tracing any drawings that were in color so that I had all line drawings to work with, then I resize all of them so that the longest side was less than 2". Then I print out all the pictures on a sheet of paper and trace them onto my fabric using the blue washable pens from Joann's that come out with cold water. Make sure that you use the washable kind and not the disappearing-over-time kind... you don't want your marks to fade away before you are finished embroidering. I tape my sheet of patterns up on one of my windows (as a light box - the sunlight behind the glass makes the paper and fabric more transparent and the design easy to see) and trace out each design into the marked squares in my fabric. After that, "embroider as you like." Haha
![]() |
| Embroidery progress |
![]() |
| Another finished bunny, this one from the Japanese stamping book Used chain stitch, satin stitch, and running stitch |
I wait until all of the embroideries on a particular fabric are done, then wash off all the pen with cold water. I heard that you should not iron your fabric or get hot water on it until the pen is gone, because otherwise it may become permanent. That has never happened to me, though. Let 'em dry and then iron them, then cut them into squares to add to your blocks.
Places to look for embroidery designs:
Flickr searches
Etsy (like Penguin and Fish and sewdeerlyloved)
Urban threads.
Thursday, October 18, 2012
New Year's resolution update, grade: D
So, back in January I posted these New Year's Resolutions:
1) Get my sewing machine serviced. I did that right away, and then just took it in again a few weeks ago.
2) Reduce my UFOs & WIPs by 5 by the end of the year. I have reduced my UFOs by 8, which puts the number of remaining WIP quilts at a quantity I can actually count reliably...8.
None of the remaining quilts are those really bad UFOs that you just wish would disappear... I love them all but I am going to continue working on them at a pace that also allows me to start (and finish, of course!) new projects. My goal in the next 2 months is to get my final count down to 5.
3) Buy less fabric than I use. I am instituting a 2 yards out, 1 yard in policy. Hahahahahahahaha. Hahahahaha. Pardon me, I need to take a laugh break.
...
...
Ok, um, no. This one did not, is not, will not be happening. Instead of reducing my stash, I have increased it by about 50% this year. I just seriously cannot. resist. Julie's. prices. Oh well! :)
On the good-girl side of things, I did finally wash, iron, fold, and sort all of the fabric that I've bought this year, along with organizing it and the rest of my stash. I have one bin of things that couldn't be fit into my fabric drawers, and I've made a deal with myself that if I still haven't used anything in the bin by January, I'm chucking the whole thing. Don't worry, guys. It's weird stuff like jeans & t-shirts that I saved for sewing into things. And stretch velour. So, nobody is gonna cry if it goes.
4) Sew 6 items of clothing, or 1 every 2 months. My count on clothes-sewn-this-year is 5, plus a shirt in progress. Assuming I manage to finish that in the next three months, I'll definitely hit this goal.
(Note that depending on your state, in the US, 75% is either a C or a D. I went to high school in North Carolina, so I'm sticking with the grading scale used there. Because, honestly, is 75% good enough to be called average??)
1) Get my sewing machine serviced. I did that right away, and then just took it in again a few weeks ago.
2) Reduce my UFOs & WIPs by 5 by the end of the year. I have reduced my UFOs by 8, which puts the number of remaining WIP quilts at a quantity I can actually count reliably...8.
None of the remaining quilts are those really bad UFOs that you just wish would disappear... I love them all but I am going to continue working on them at a pace that also allows me to start (and finish, of course!) new projects. My goal in the next 2 months is to get my final count down to 5.
3) Buy less fabric than I use. I am instituting a 2 yards out, 1 yard in policy. Hahahahahahahaha. Hahahahaha. Pardon me, I need to take a laugh break.
...
...
Ok, um, no. This one did not, is not, will not be happening. Instead of reducing my stash, I have increased it by about 50% this year. I just seriously cannot. resist. Julie's. prices. Oh well! :)
On the good-girl side of things, I did finally wash, iron, fold, and sort all of the fabric that I've bought this year, along with organizing it and the rest of my stash. I have one bin of things that couldn't be fit into my fabric drawers, and I've made a deal with myself that if I still haven't used anything in the bin by January, I'm chucking the whole thing. Don't worry, guys. It's weird stuff like jeans & t-shirts that I saved for sewing into things. And stretch velour. So, nobody is gonna cry if it goes.
4) Sew 6 items of clothing, or 1 every 2 months. My count on clothes-sewn-this-year is 5, plus a shirt in progress. Assuming I manage to finish that in the next three months, I'll definitely hit this goal.
(Note that depending on your state, in the US, 75% is either a C or a D. I went to high school in North Carolina, so I'm sticking with the grading scale used there. Because, honestly, is 75% good enough to be called average??)
Friday, September 28, 2012
Boo Bee Round 2 - Kathleen's Quilt
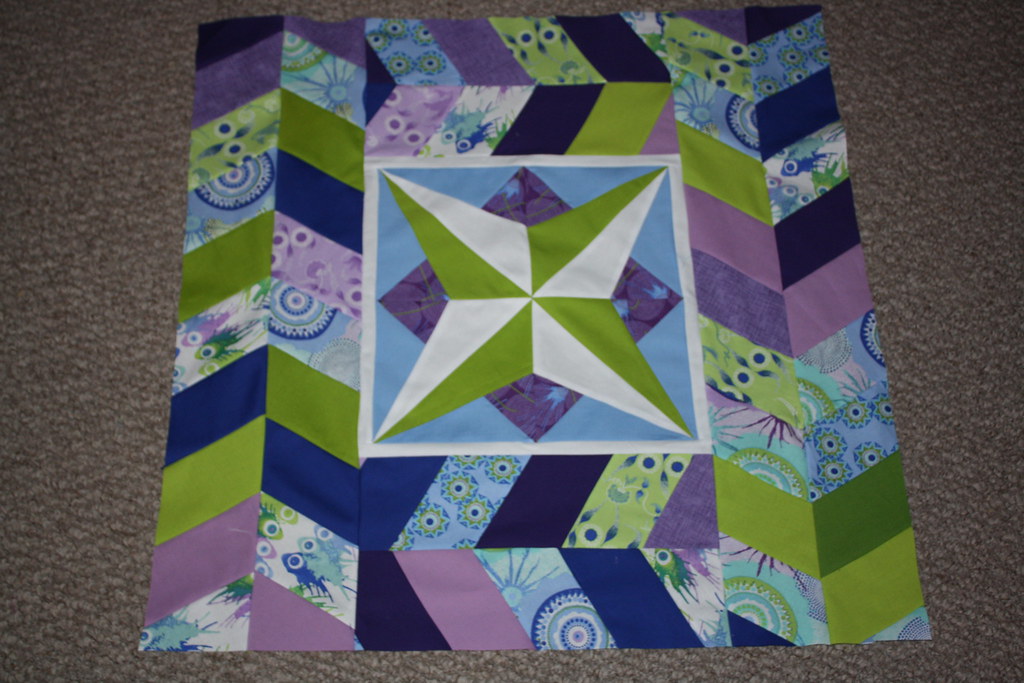
I'm back with another round robin update! This time I got Kathleen's quilt start, which looked like this after Mallory had done her magic:
I felt that the center needed a bit of breathing room, so I decided to incorporate a lot of white in my round. While I was pondering, I came across these images for Rita Hutchens' class on zig-zags and chevrons. Pretty, pretty! I haven't taken her class, so I'm not sure what her method is, but I just made strips and cut them on the bias. It worked out just fine, although my method wasted a lot of white fabric.
Even with the strip piecing, this took a loooong time. I calculated that there are more than 450 pieces of fabric in my round. Bee mates. I know I said one month for next round, but I forgot that the rounds are getting bigger & bigger. Let's go back to 2 months for the last round, k?
I hope you like it, Kathleen!
I felt that the center needed a bit of breathing room, so I decided to incorporate a lot of white in my round. While I was pondering, I came across these images for Rita Hutchens' class on zig-zags and chevrons. Pretty, pretty! I haven't taken her class, so I'm not sure what her method is, but I just made strips and cut them on the bias. It worked out just fine, although my method wasted a lot of white fabric.
Even with the strip piecing, this took a loooong time. I calculated that there are more than 450 pieces of fabric in my round. Bee mates. I know I said one month for next round, but I forgot that the rounds are getting bigger & bigger. Let's go back to 2 months for the last round, k?
I hope you like it, Kathleen!
Subscribe to:
Posts (Atom)