Sunday, June 14, 2009

Swaps

I finished up two swaps this weekend! Most people wait until their swaps have arrived before blogging about them, but since none of my three readers know my swap partners, I think I'm safe.

The first is for a set of nine patches:


The yellow and blue patches are 12.5" raw to raw and the shades of blue patches are 10.5" raw to raw. WAT?? Yeah seriously, the girl requested 10.5" squares. She said that she didn't really understand seam allowances, but that all of her other squares were that size. That works out to squares cut 3 5/6", so I ended up cutting them 4" and then just sewing them together repeatedly with different seam allowances until it turned out right. (Mostly) It was quite a pain.

I also made a reusable grocery/tote bag. I started this swap a little early, and made this bag from some remnant fabric that I found at Joann's. Two dollars for it! I think it's meant for upholstering outdoor furniture.


It ended up being more of a beach tote shape than a traditional grocery bag shape because the fabric remnant was only 18" x 60", so my options were limited. Because of the cut shape, I made the bag with a seam on bottom and up one side instead of a seamless bottom and seams on both sides. As usual, my "wing it" attitude made the bag more difficult than it had to be (attaching the straps was un-fun), but I got through it.
Unfortunately, by the time I had finished the bag, I was sort of in love. I mean... look at how the pocket stripes head the other direction! It's just a grocery bag, but I couldn't give it away. Luckily, once my partner was assigned, I saw that her preference is for lavender and teal, so I had an excuse to make her a new bag and keep that one. I made it out of some denim fabric that I had stashed and accented it with some leftover costume fabric. This was the result:
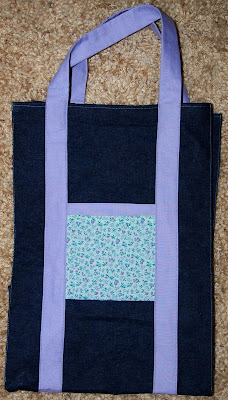


Hopefully my partner likes the denim bag... it's not much to my taste so I don't mind sending it off. :P

Monday, June 1, 2009

4th finish and whoa progress!

I sewed up this little number a few weekends ago and just now got around to taking pictures:


I started by randomly cutting into a pair of old jeans, which probably wasn't the most efficient thing, since I later wished that I had left on some of those fabric bits that I had cut off initially, but it was great for the creative process because I ended up having to piece bits back together to get the size of bag that I wanted. It's just right for carrying around my embroidery... except that now I only have one little one left to finish. You can sort of see the little Winnie-the-Pooh fabric that I used to line the bag... that was a steal from Walmart. It's not a very durable-looking fabric, but it's nice and soft. :)

This weekend I worked on my big quilt, and oh-em-gee it's going faster than I expected. I finished all of the pieced blocks for the center of the top and got a good start on the pieced border. Here's what it looks like so far:


I am so, so pleased!

Thursday, May 28, 2009

2 finishes!

I surprised myself by finishing these two embroidery patches during my camping trip, which was really fun (and ended too quickly.)


The little mexican kitty is one of my favorites. She started with a pink bow, but I think the red is more fitting.

Tuesday, May 19, 2009

Fabric arrived and quilt squares made

I tested my fabric for colorfastness and laid it out this weekend:


I'm pleased... it really looks good! And my first squares came out well, also:


A major bummer, though... on one of the embroidery squares (not shown) I cut in the wrong place and had to piece on an additional piece of fabric. I guess it's not too noticeable, so I'm not redoing the embroidery. I think it'll be a while before I get back to sewing on this because I'm going camping this weekend. :D Ah, vacation, I have been missing you.

Monday, May 18, 2009

Quilt layout and size calculations

The first thing I did was to calculate the quilt size that I wanted. I decided to make it a twin, but on the large side so that it would work on a double bed as well. I laid the entire quilt out electronically using MS Paint... it's not the most versatile graphics program, but it was quite adequate for the purpose. I really got waaay into this electronic layout. I went as far as to copy fabric swatches from the site where I purchased the fabric and use them as my building blocks. I tried random distributions and arranged distributions, and various border sizes and compositions:


In the end, I decided to go with the design shown above, center. I liked the random layout, but was afraid it would overwhelm the embroidery squares. For the border, I knew that it needed to be fairly large so that I would not have to make the center larger (and do more embroidery!) I liked the quilted portion of the border, and arranged the rest to be simple, but somewhat broken up so that it didn't attract the eye too fiercely.

From here I calculated the fabric requirements. It took quite some time, and I'm glad that I saved the information, because I have referred back to it several times. I double and triple checked my numbers, (and then quadruple checked because the first 3 times I got a different answer each time... finally figured out that I was treating the borders incorrectly). Even when I got it all straightened out, I ordered extra of everything because the fabric was selling out. I will be glad to have some extra when I am done... it's such cute stuff!

Monday, May 11, 2009

Quilt Color selection

My niece's mother and I decided that the quilt should be pink and green... green to tie it in with her current bedroom decorations and pink, which is her favorite color. I did all of my color selecting by computer, from fabrics.com. They have a handy tool that lets you collect your color swatches digitally and then move them around. I didn't like the fact that adding or removing a swatch messed up your organization, though.

There were such beautiful fabrics! Someday, I will definitely have to build a quilt around these:


For my niece, though, I initially selected these, though I wasn't very excited about the color scheme:


Before I got further in the selection process, though, I saw this:


Not only was it easier on me (it's offered in a jelly roll from Moda) being pre-cut, but I liked it much better than the pinks and greens. My sister thought that my niece would love the cheerful colors and thought it would look great in the room. Whew! I learned from my mother's example that it is much easier to make a quilt that you like.

Thursday, May 7, 2009

My First Finish!

Today is my first finish for the second round of Spring to Finish. I completed this embroidery for my niece's quilt. I like to call it "The Pornographic Ken-Doll Raccoon and His Victim."


Backing up a bit, after I had picked out embroidery patterns, I looked at quilt layouts to see what I liked. I didn't have to look very far here, because the one I ultimately picked was one of the first that I saw. I liked the way the embroidery squares were framed by the patchwork squares, and I appreciated the simplicity of the patchwork portions.

I decided not to do it in redwork, though, since I thought my embroidery designs would look better in color.

Next I turned to looking at fabrics...